Important note
The payment gateway you select should not display any pages, such as an order confirmation page or an order details page, before the payment gateway.
In this case, the Direct plugin will not function correctly, as it only skips the cart and checkout pages.
All users tab
In this tab, you can configure the common settings for logged-in users and guest users for payment forms on product pages.
- Select Active Payment Gateway: Select the payment gateway you want to use for direct payments.
- Display Quick Payment Form For: This option determines on which product pages the quick payment form will be displayed.
- Select product for include: With this option, you can enable quick payment forms for all products, selected products, or all products except a few specific ones.

Logged in users tab
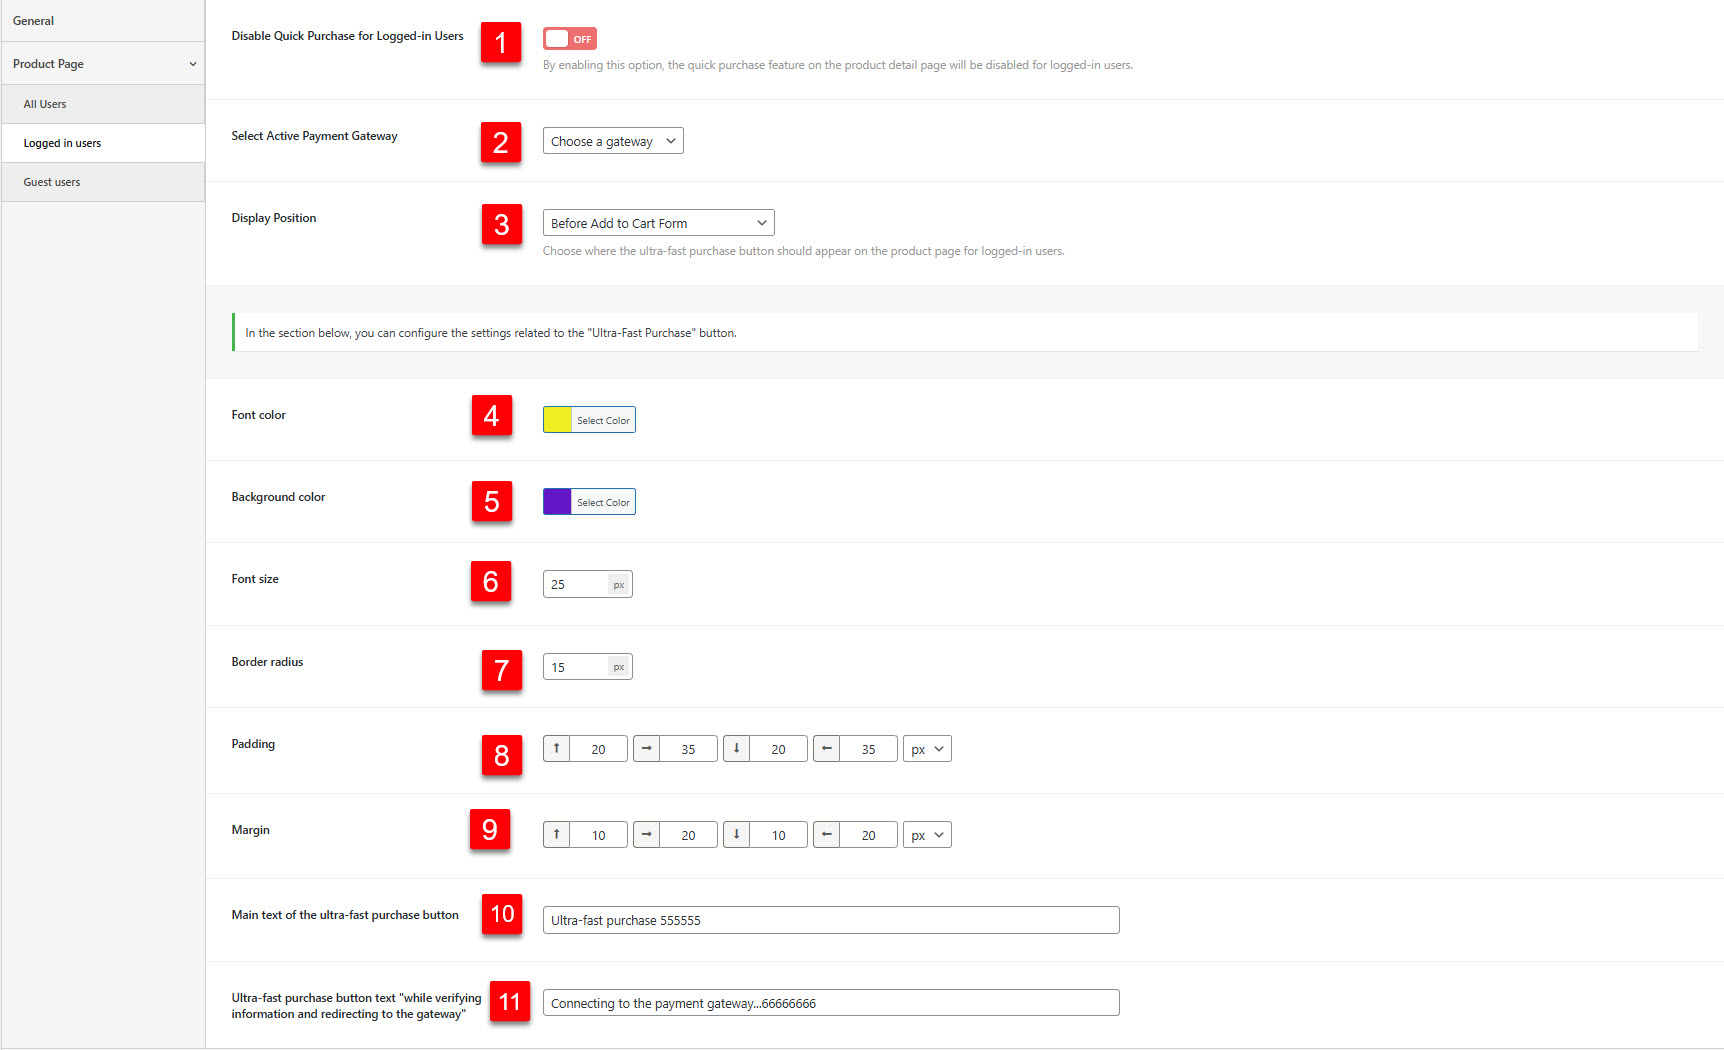
In this tab, you can configure specific settings for users who are logged into their accounts on your site.
- Disable Quick Purchase for Logged-in Users: By enabling this option, the quick purchase feature on the product detail page will be disabled for logged-in users.
- Select Active Payment Gateway: Select the payment gateway you want to use for direct payments for logged-in users.
- Display Position: Choose where the ultra-fast purchase button should appear on the product page for logged-in users.
- Font color: Sets the font color of the ultra-fast purchase button.
- Background color: Sets the background color of the ultra-fast purchase button.
- Font size: Sets the font size of the text on the ultra-fast purchase button.
- Border radius: Sets the border radius of the ultra-fast purchase button.
- Padding: Adjusts the padding of the ultra-fast purchase button.
- Margin: Adjusts the margin of the ultra-fast purchase button.
- Main text of the ultra-fast purchase button: Enter the main text that will be displayed on the ultra-fast purchase button.
- Ultra-fast purchase button text “while verifying information and redirecting to the gateway”: Enter the text that will be displayed on the ultra-fast purchase button while verifying information and redirecting to the payment gateway.
Guest users tab
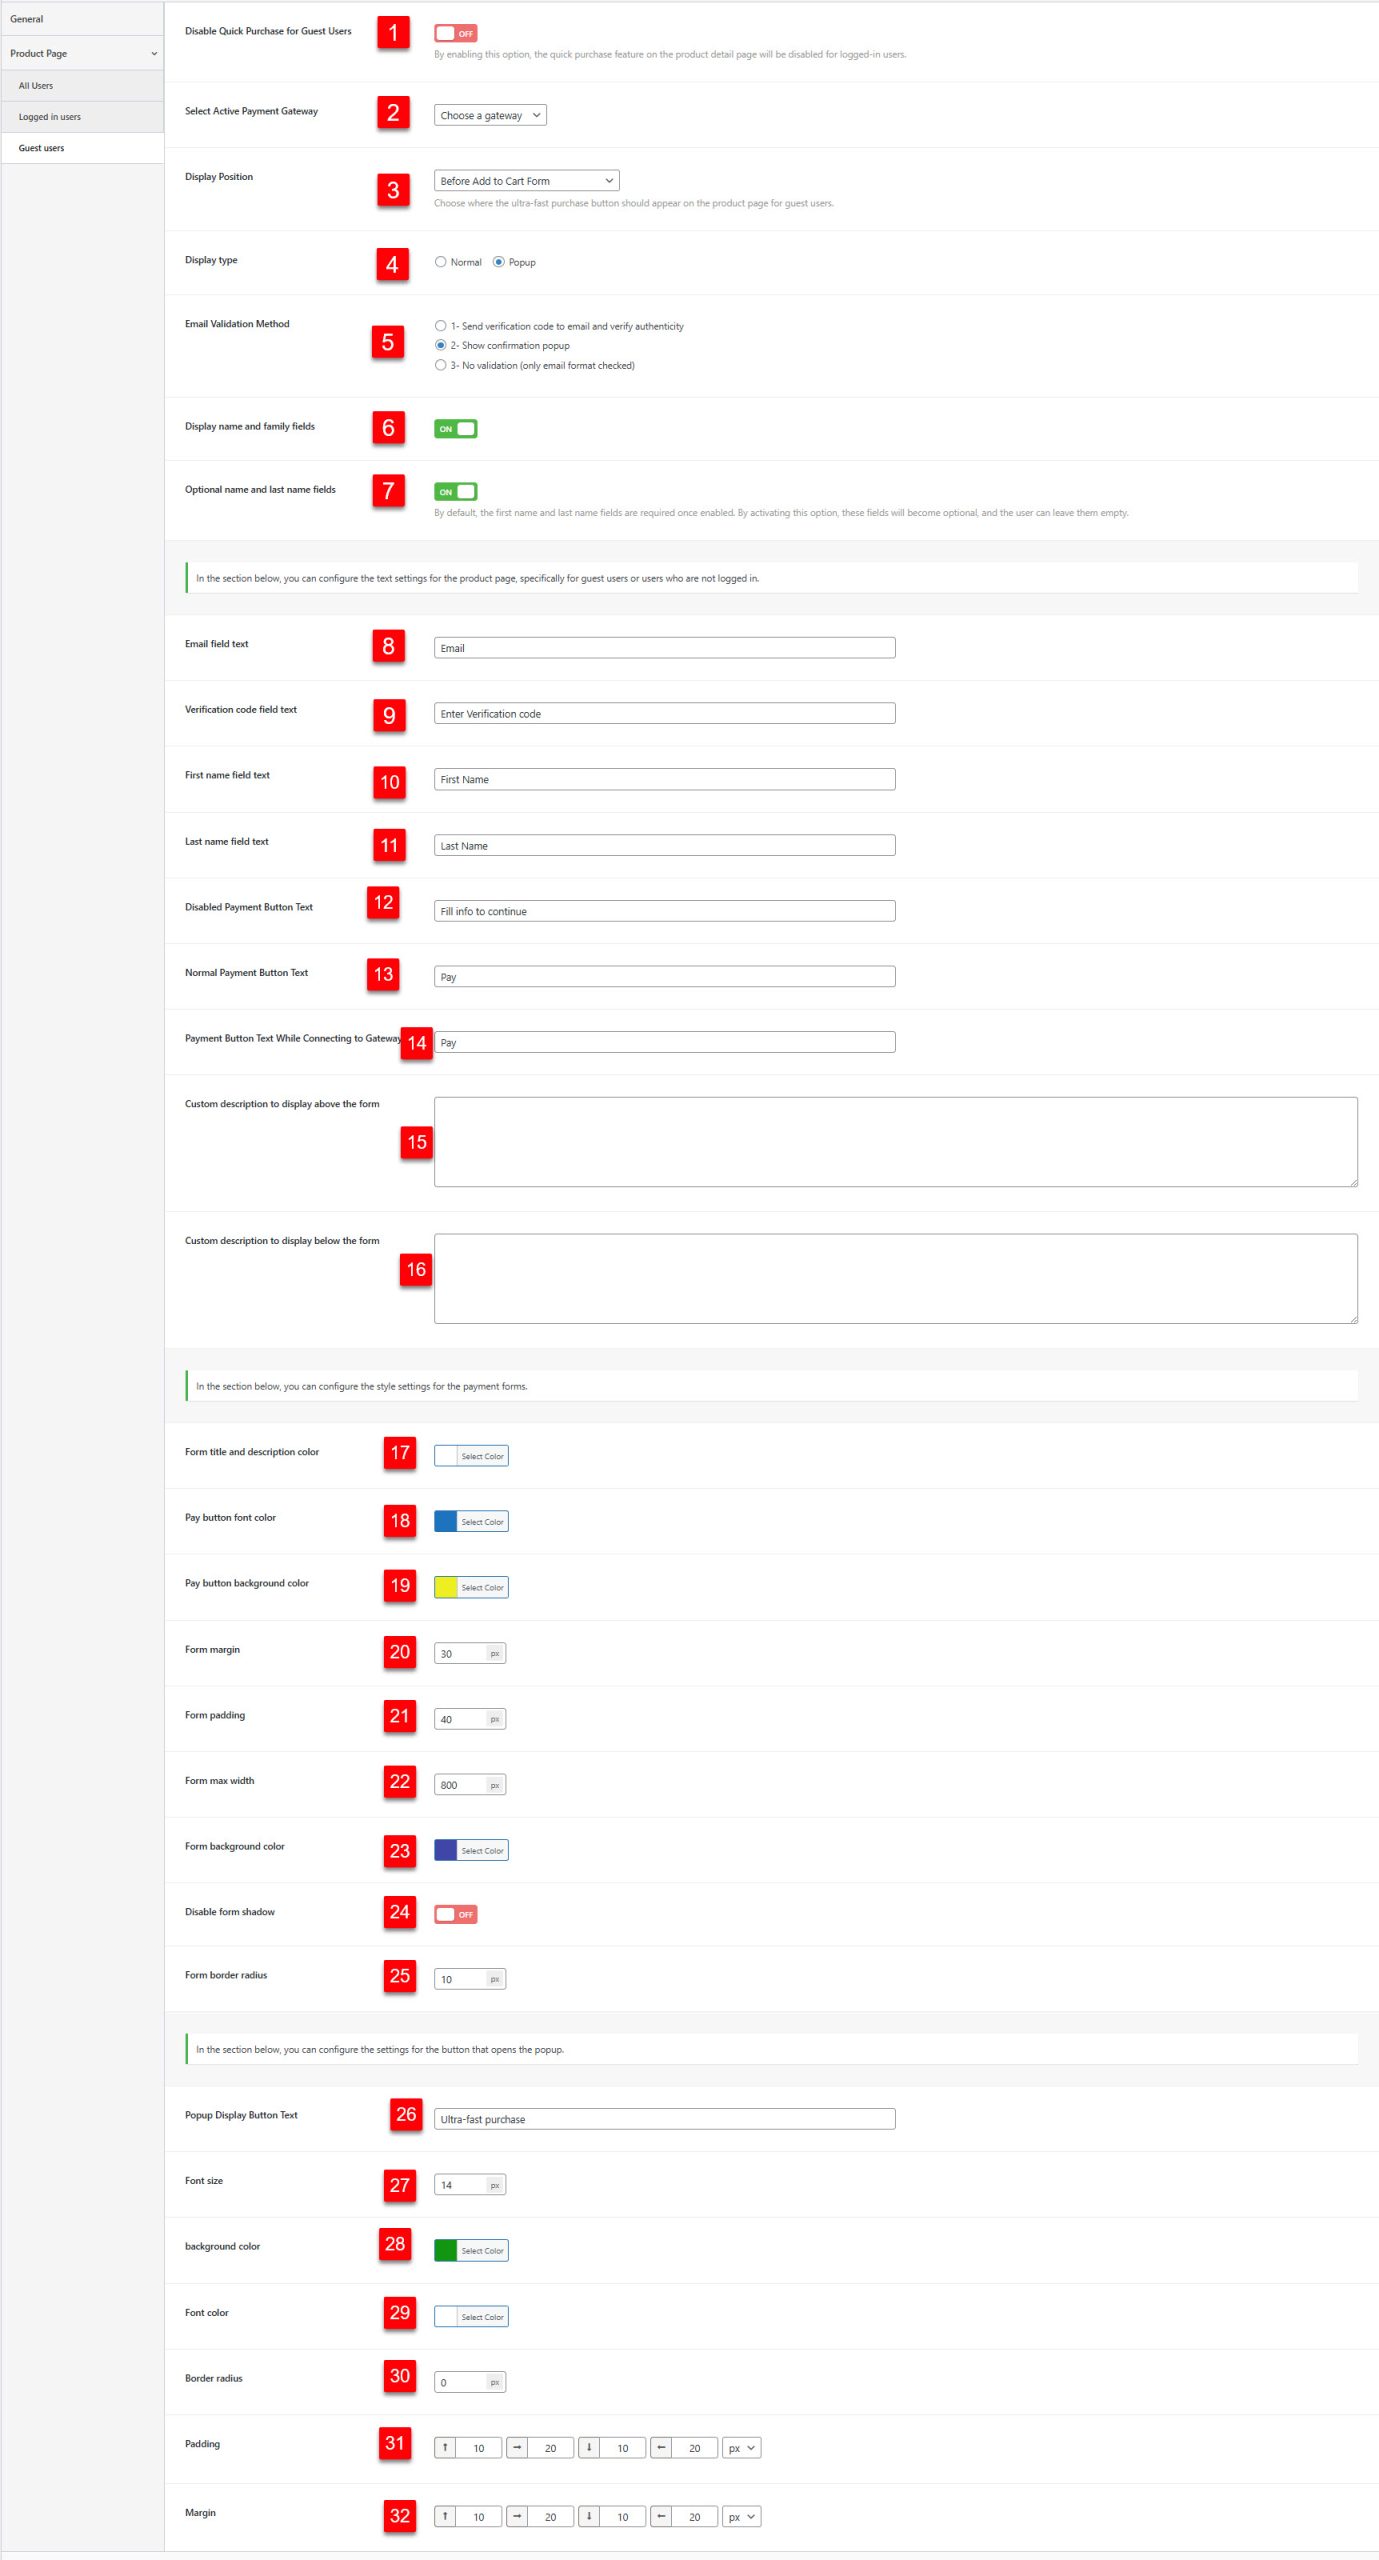
In this tab, you can configure specific settings for guest users (users who are not logged into their accounts) on your site.
- Enable Quick Purchase for Guest Users: By enabling this option, the quick purchase feature on the product detail page will be enabled for guest users.
- Select Active Payment Gateway: Select the payment gateway you want to use for direct payments for guest users.
- Display Position: Choose where the ultra-fast purchase button should appear on the product page for guest users.
- Display Type: Choose whether the quick purchase button should be a simple button or a form.
- Email validation method: Select the method for email validation.
- Display name and family fields: When this option is enabled, name and family fields will be displayed on the product page.
- Optional name and last name fields: By activating this option, name and last name fields are optimized and simplified.
- Email field text: Enter a text for the email input field.
- Verification code field text: Enter a text for the verification code input field.
- First name field text: Enter a text for the first name input field.
- Last name field text: Enter a text for the last name input field.
- Payment button text(Disable mode): Enter the text for the Payment button when it is disabled.
- Payment button text(Normal mode): Enter the text for the Payment button when it is normal.
- Normal Payment button text “while verifying and redirecting to the gateway”: Enter the text for the Payment button that is displayed while verifying and redirecting to the gateway.
- Custom description to display below the form: Enter a caution description to be displayed below the payment form.
- Custom description to display abowe the form: Enter a caution description to be displayed abowe the payment form.
- Form title and description color: Sets the color of the title and description of the payment form.
- Pay button font color: Sets the font color of the payment button.
- Pay button background color: Sets the background color of the payment button.
- Form margin: Adjusts the margin of the payment form.
- Form padding: Adjusts the padding of the payment form.
- Form max width: Sets the max width of the payment form.
- Form background color: Sets the background color of the payment form.
- Disable form shadow: Enables or disables the shadow for the payment form.
- Form border radius: Sets the border radius of the payment form.
- Popup display button text: Enter the text for the display button in the popup.
- font size: Sets the font size for popup button.
- Background color: Sets the background color of the popup button.
- Font color: Sets the font color of the popup.
- Border radius: Sets the border radius of the popup button.
- Padding: Adjusts the padding of the popup button.
- Margin: Adjusts the margin of the popup button.